Wreck of HIJMS Asakaze (朝風)
Philippines /
Ilocos /
Aloleng /
World
/ Philippines
/ Ilocos
/ Aloleng
World / Philippines / Zambales / Candelaria
crash site, shipwreck
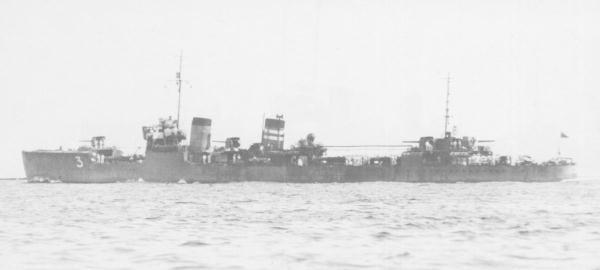
Laid down at the Mitsubishi-Nagasaki shipyards in February 1922 as the second member of the Kamikaze Class of Destroyers, HIJMS Asakaze commissioned into Imperial Japanese Navy service in June 1923. Initially operating with the main units of the Japanese fleet and the fledgling Aircraft Carrier force on Japan’s Pacific coast, Asakaze and her crew were eventually assigned to screen convoys and naval formations supporting Japanese operations in China through the 1930’s during the Second Sino-Japanese War.
Serving with Destroyer Division 5, Squadron 5 in the IJN Third Fleet on the eve of Japan’s surprise attack on the US Pacific Fleet at Pearl Harbor, the elderly Asakaze was assigned to screen the warships and transports involved with “Operation M” as they conducted the Japanese Invasion of the Philippines, with Asakaze lending her fire support to the landings at Lingayen in late December 1941. Returning to convoy escort work into early 1942, Asakaze was screening troopships as they landed elements of the Imperial Japanese Army outside of Jakarta, Java when she received flash traffic that indicated that enemy ships were moving up the Sunda Strait towards the landing beaches and was ordered to prepare for immediate battle. Steaming to flank speed and joining into formation with two Light Cruisers and a van of fellow Destroyers, Asakaze clashed for the first time with elements of the Allied Naval Forces in the Battle of Sunda Strait, lending her entire load of “Long Lance” torpedoes to the overwhelming defeat of the remaining ABDA Fleet and helping sink both USS Houston (CA-30) and HMAS Perth (D29). With organized surface naval resistance all but swept from the Eastern Pacific following this battle, the Asakaze was reassigned to the Southwest Area Fleet in March and began what would become two years of convoy escort operations, protecting the vital marine supply lines which kept Japan on a wartime footing.
By mid-1944 the situation in the Pacific had changed greatly for Asakaze and her crew, with Allied forces making significant advances on Japanese territory and American Submarines decimating Japan’s poorly organized and under-protected convoy systems. The increased presence of American Submarines and aircraft had seen much of Asakaze’s anti-ship armament removed in favor of depth charge racks, hydrophones and anti-aircraft guns as her once rear-area patrol route became increasingly infiltrated, and by July 1944 she was operating with the General Escort Command on a regular route between Saipan and the Philippines screening troopships and transports bolstering both manpower and defenses at both locations in preparation for American Invasions. After screening a convoy to Takao, Formosa from Saipan in early August, the Asakaze was attached to ill-fated Convoy HI-71 and departed for Manila on August 17th, and managed to survive the coordinated wolfpack attack on the convoy three days later. In the aftermath of the American Submarine attacks, Asakaze covered the remaining ships of the convoy into San Fernando Harbor where HI-71 disbanded and was broken into smaller groupings for the final leg to Manila.
Departing San Fernando on August 23rd escorting two tankers along with two armed trawlers, Asakaze positioned herself to seaward of her charges as the small convoy rounded Cape Bolinao, where the lead tanker and trawler were sighted by the periscope of USS Haddo (SS-255), a patrolling American Submarine. Alert crew aboard the Asakaze picked up the sounds of the Haddo’s suddenly-engaged propellers churning away below the surface, prompting the Destroyer to flank speed and her depth charge crews to their battle stations. As she bore down on the Submarine contact and prepared to attack, the sound of Asakaze’s high-speed screws was picked up by sonar crews aboard the Haddo and the Submarine quickly came about and fired four torpedoes directly into the path of the onrushing Asakaze at short range. Though all four torpedoes were spotted by her crew, Asakaze’s high speed and close proximity to the Haddo meant that she was unable to evade before all four shots struck the Veteran Destroyer in her bow, causing severe damage and a likely detonation of her forward ammunition magazines.
Rising clear out of the water by the force of the combined blasts, Asakaze’s entire bow forward of her bridge wrenched off the ship as she crashed back to the surface, her momentum digging the ship’s forward section bow deep below the surface before she briefly leveled out. Ordering the ship to a stop, Asakaze’s Captain set damage control crews forward to counteract flooding below decks as her fellow escorts set about attacking the American Sub, eventually driving it away without any further attacks on the convoy. Still afloat with her bulkheads leaking but holding, Asakaze was abandoned by all but a skeleton crew and placed under tow by the tanker Nijo Maru towards Dasol Bay, but after several hours of slow progress several damaged bulkheads began to fail and inrushing seawater soon overwhelmed the ship’s mechanical and crew-powered pumps. With the ship clearly lost, Asakaze’s Captain ordered her colors struck and the Emperors Portrait removed before abandoning the foundering Destroyer, which remained afloat barely long enough to get her last crew to safety before sinking bow-first at this location on August 24th, 1944.
www.combinedfleet.com/asakaz_t.htm
Wikipedia article: http://en.wikipedia.org/wiki/Japanese_destroyer_Asakaze_(1922)
Nearby cities:
Coordinates: 16°5'59"N 119°43'59"E
- Wreck of MV Princess of the Orient (SLI) 302 km
- Wreck of HIJMS Musashi (武蔵) 444 km
- Wreck of the Japanese aircraft carrier Zuikaku 686 km
- Wreck of HIJMS Yamato (大和) 1835 km
- Wreck of the Japanese aircraft carrier Taiho 2040 km
- The place of shipwreck of the destroyer «Blestyashiy» 2132 km
- Wreck of USS Oklahoma City (CL-91/CLG-5/CG-5) 2488 km
- Location of the loss of the cruiser "Svetlana" 2532 km
- Wreck of USS Grenadier (SS-210) 2632 km
- Chittagong Ship Breaking Yard (Fauzdahart Beach) 3027 km
- Purok Barikir Agno Pangasinan 5.3 km
- Sabangan 6.2 km
- Agno National High School 7.1 km
- QUARRY 8.4 km
- Baruan Bay 8.7 km
- Labang 12 km
- Burgos Central School 15 km
- Burgos National High School 15 km
- Concordia 16 km
- Pangasinan 65 km